CLICK HERE FOR FREE BLOG LAYOUTS, LINK BUTTONS AND MORE! »

Monday, June 20, 2011

The WINNER of the Father's Day Card Challenge is....

I hope you all had a wonderful weekend and Father's day and took time to appreciate the special Father's in your life! So in honor of Father's Day, I issued a challenge to you all to create a Father's Day card and share your creations with me...well only one soul was up for the challenge and so is my uncontested WINNER of my Father's Day BLOG CANDY!!!!

And the Winner is....


Christina of  CG-Says!!!
You can see the beautiful Father's Day Card Christina created for my challenge on her blog HERE.


Thanks for accepting my challenge Christina and playing along! Please send me an email with your contact info so I can get your blog candy out to you this week. I will update this post with a picture of the blog candy that Christina won!!

hugs,

Tuesday, June 14, 2011

Father's Day Cards

Happy Tuesday Crafters and bloggers! I have MISSED YOU ALL! It's been a minute since I have posted I know! But I have been busy crafting...just for other venues that I couldn't share here...but I'm back and will try update my blog more often!!:o)

It's that time again bloggers and crafters! Father's Day is almost upon us! Have you made or purchased your cards yet? Well this time I made my cards! This first card is one I made for a customer to give to his father who enjoys fishing. This is my very first time making a masculine card, and while the card looks simple enough, it took me a while to come up with a concept I was OK with...


The Recipe:
  • Card Front patterned paper: Max and Whiskers Collection by Basic Grey
  • Fisherman and water: Cricut Sampler Cartridge
  • "Happy Father's Day" Sentiment: Cricut Holiday Cakes Cartridge
  • "Papi": Sesame Street Font Cartridge
  • Card Inside: Fishing pole cutout: Just Because Cricut Cartridge
  • Sentiments, water and inside card base were cut using Bazzill cardstock
Now on to the GOOD stuff! A challenge AND some goodies! For those that choose to accept, you have until Saturday, June 18th at 12 midnight EST to create a Father's Day card and post to your blog and link to my blog by adding your link in the Mr. Linky below for a chance at some FAB blog candy!! Be sure to follow my blog and leave a comment as well as I will draw a name from the total number of comments using Random.org on Sunday, June 19th. I will post a pic later on what the candy will be...but I promise it will be great!! The only catch is that your card must be new and not one that you have previously created! Have fun! I would love to get inspired by seeing some more masculine cards!!

XOXO,


Monday, May 9, 2011

Graduation Cards

Hey Friends!

Just quickly dropping off some graduation cards I made for a customer. This is the fastest I have EVER created cards! Could it be I am starting to find my Card Mojo? It impressed me! They are not terribly fussy...but simple and hopefully elegant. 


 First Card:


 Second Card:


The Recipe
  1. For both cards I used patterned paper from the DCWV High School Stack.
  2. For the first card (Silver and black) I stamped the outside and inside sentiments with VersaMark ink and embossed with Glitter Finish Silver and Opaque Finish Charcoal Zing! Embossing Powders. I also stamped and embossed the graduation cap and "handmade" stamp on back the same way.
  3. For the second card (multicolored) I adhered graduation vellum sticker sentiments to coordinating solid card stock that I cut and embossed with a rectangle spellbinders die. I stamped the diploma on the front of the card with VersaMark and embossed with Opaque Finish Charcoal Zing! embossing powder.
  4. Both cards were inked with Ranger Black Soot Distress Ink as I thought appropriate. 
That's it! Quick, easy and pretty! I think I may be getting the hang of card making! LOL Let me not say that too loud! LOL 

Thanks for Looking,

Mother's Day Card

Hey Friends!

Here is a Mother's Day Card my made for a customer. My customer's Mother likes roses and butterflies, so this is what I came up with. 

The Front:
The Inside:

The Recipe

  1. Yikes! I can't recall the name of the patterned paper right now. The roses are by Recollections and I sprayed them with pearl Glimmer Mist so it has a shimmer. 
  2. I cut the mat for the sentiments from the Spellbinders Label 6 dies.
  3. I added cream lace that I also sprayed with pearl Glimmer Mist and added flat back pearls. I also punched a tiny butterfly from a punch and added pearls to it.
  4. Everything is inked with Cats Eyes Inks by ColorBox.
Believe it or not but it took me a LONG time to figure out how I wanted to design this card! But I LOVE how it came out! And my Customer did too! 

Thanks for Looking!

Sunday, May 8, 2011

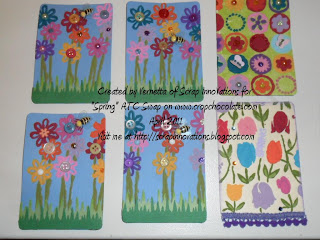
Spring ATC Swap at Crop Chocolate

Hey Friends and Crafters!

I hope all you Mothers out there had a WONDERFUL MOTHER'S DAY!

I know I have not posted in a HOT Minute but I have been busy crafting...I just need to catch up on posting!

I participated in an ATC swap hosted by the FAB JeepMama(Paula) over at Crop Chocolate. It is a FAB One Deal at a Time Website with AWESOME Scrappy stuff so Check it out!

Moving along, the theme was SPRING, so I created these cute and bright...kinda whimsical ATCs to depict spring.


Some close ups


The Recipe

  1. First I embossed the Cuttlebug Bloom Dots and the Flowers folder from the "with Love" folder borders set and the Spellbinders Impressabilities: Tulips onto manila card stock.
  2. Using the Spellbinders embossing plate as a stencil, I painted the tulips and stems with various colors of acrylic paint. For the Cuttlebug embossing because the impressions are deeper, I could easily paint the flowers with various colors of acrylic paints.
  3. I finished off these ATCs by adding bling, buttons, Bees, pearls, trim and stickles to jazz it up. I also added grass some of the ATCs as well.
The result is a set of fun, bright, whimsical SPRING ATCS! I LOVE how they came out! I need to make a set for my own collection!

Thanks for looking! 
Hugs, V

Monday, March 21, 2011

Altered Container and Mini Album Swap

Hey Bloggers and Crafters!

Here is an altered container and mini album that I created for a swap that I hosted for the ladies on the Sista's Scrap Too Forum at Cricut.com. The rules were simple. Alter a container and create a mini album that fit inside for your swap sister based on her likes and such. So I sent out a "Getting to know your Sista" questionnaire and such so everyone got to know more about their swap partner. We also had to include some scrappy or other type of goodies for our swap sister as well. So this is what I came up with for my swap Sista Yvatte. Here are the pics and you can watch the video I made on YouTube HERE.


Thanks for looking!

Hugs, IslandV

Sunday, March 20, 2011

Baby Girl Onsie Mini Album

Good Early Morning to you all! I wanted to drop off another project I recently completed. I was commissioned to create a Baby Girl Onsie Mini album for a client and wanted to share with you all the end result. I had so much fun making this album and think it came out so so cute! I will post my video once I figure out how to edit it...currently it is too long for YouTube. In the meantime, here are the pics of the baby album.

This time around I broke out my cricut to create the shape of the mini and some of the embellishments inside as well.

Thanks for looking!

Hugs, IslandV